Email Test Cases: Your Guide Through All the Steps

In this article, I’ll take you with me on a journey guided by a team of QAs, deliverability experts, and email marketers, where we will not only explore email test cases but also learn the steps for creating a comprehensive range of checks.
Let’s dive in!
Email contact form test cases
When conducting research for this article, the first type of email test cases I learned about were the ones used for email contact forms.
And yes, while I know it might not sound like the most exciting thing to do, email contact form testing can be what prevents you from losing leads, customer feedback, support queries, and so on.
The QA team I shadowed for this task did a very thorough job of ensuring the email contact form they were testing was not only functional but also secure, reliable, and user-friendly.
Here is the list of test cases that were written and conducted:
Form fields:
Checked if all required fields (name field, email address field/email ID field, message field, etc.) are validated for input.
Tested for validation messages/notifications when required fields are left blank.
Validated format-specific fields (e.g., email address, which needs to follow the correct format but can include special characters like dashes or underscores).
Email address:
Ensured the form detects invalid email address formats (e.g., email addresses containing an unusual top-level domain, square brackets but no IP address, more than two dots in case of a subdomain, a trailing dot or leading dot, local part over 64 characters, and so on).
Tested with invalid and valid email addresses to see if the form behaves as expected.
Input length:
Checked the maximum and minimum character limits for fields like name and message.
Validated the behavior when the input exceeded the character limit.
Submit button:
Verified the submit button works correctly after filling out the form.
Tested the behavior of the form when the submit button is clicked with incomplete/invalid data.
Confirmation message:
Checked if a confirmation email is sent to the user after successful submission.
Verified the content and format of the confirmation message.
Error handling:
Tested how the form handles network issues or server errors.
Ensured appropriate error messages are displayed for different types of errors.
Cross-browser compatibility:
- Tested the form on different browsers to ensure consistent functionality and appearance.
Responsiveness for various devices:
- Ensured the form was easily usable on mobile devices with different screen sizes.
Security:
Tested for vulnerabilities like SQL injection, XSS (Cross-Site Scripting), and CSRF (Cross-Site Request Forgery).
Ensured that captcha or similar mechanisms were in place.
Integration:
- Checked if the form correctly integrates with backend systems like databases or email servers.
User interface and accessibility:
Verified the form is user-friendly and accessible, including clear labels, readable fonts, and a logical layout.
Ensured accessibility for users with disabilities, like keyboard navigation and screen reader compatibility.
Contact forms can be built in a range of programming languages. Check out our tutorials on some of the most popular ones:
Email body/content test cases
After email contact forms, the time came to test the body and content of emails. These types of test cases are quite important for a range of reasons, including:
They ensure that the email correctly addresses the intended context and user actions, especially in the case of dynamic content and personalized messages.
They ensure that the various formatting elements are rendered correctly, regardless of email client or device.
They verify that the links and CTAs within the email are functional and lead to the correct destinations.
They assess how emails behave in case of errors or unexpected user actions.
They ensure that email loading time is not hindered by media elements.
They confirm that the language translations, from English to other languages, for example, and any cultural content are accurate and appropriate.
To learn about email body/content test cases, I shadowed the same QA team joined by a few email marketers who were in charge of giving the team pointers on coming up with test case ideas.
The test cases completed can be put into three different categories:
Web browser email rendering
The idea behind our email rendering test cases was to focus on several aspects of the email body/content and ensure the email in its entirety displays correctly and consistently on different browsers.
Completing these test cases is critical as each browser has its own way of interpreting and rendering HTML and CSS, which might lead to an inconsistent way of displaying the layout, formatting, and interactive elements. An email marketer’s nightmare!
These were our web browser email rendering test cases:
Layout and structure:
Checked if the email layout (headers, footers, columns) was consistent across browsers.
Ensured that the spacing, alignment, and positioning of elements were as intended.
Fonts and text styling:
Confirmed that the chosen fonts are displayed correctly.
Checked text size, color, and styling (bold, italics) across different browsers.
Links and buttons:
Tested all hyperlinks and buttons to ensure they were clickable and redirected to the correct URL.
Verified the visual and functional aspects of buttons, such as hover effects.
Interactive elements:
- Tested interactive elements (like dropdowns and tabs) functionality.
Color rendering:
- Checked how colors are rendered in different browsers to ensure consistency and visibility.
Accessibility features:
- Tested for accessibility features like alt text for images and ensured they were functional.
Loading speed:
- Assessed the loading time of the email.
Special characters and emojis:
- Checked if special characters and emojis are displayed correctly.
Fallbacks for unsupported features:
- Tested fallbacks for features that are not supported by certain browsers or email clients (like web fonts).
Incognito/private mode:
- Verified rendering in private or incognito modes.
Responsiveness
After web browser rendering test cases, we took the next logical step and proceeded to write and conduct email responsiveness test cases.
Through these test cases, we can verify whether an email’s design is of an adaptive and responsive nature. And if yes, we can also guarantee that no matter what device a user is on, the email content will be legible, accessible, and consistent.
Our test case batch included the following:
Layout adaptability:
Verified that the email layout was adjusted to fit the screen sizes of different devices, such as desktops, tablets, and smartphones.
Checked if multi-column layouts collapsed or stacked appropriately on smaller screens.
Readable text:
- Ensured that text remained legible without zooming on all devices, including checking font sizes, line spacing, and paragraph formatting.
Scalable images:
- Ensured that images scaled correctly to fit various screen sizes, were clearly visible, and were not cut off or excessively large on smaller screens.
Clickable elements:
- Verified that links and buttons were easily clickable on touch devices, adequately spaced, and large enough to tap without zooming.
Content visibility:
- Ensured all critical information and calls-to-action were prominently visible without horizontal scrolling or zooming.
Email header and footer:
- Checked that the header and footer content scaled well and was easily readable across devices.
Media queries:
- Ensured that media queries worked correctly to apply different CSS styles for different screen sizes.
Load time:
- Assessed the loading times on mobile devices.
Orientation responsiveness:
- Tested both landscape and portrait orientations on mobile devices to ensure the layout was adjusted correctly.
Accessibility:
- Ensured that the email was accessible in terms of contrast, font sizes, and alt text for images, especially on smaller screens.
Preview text:
- Checked how the preview text displayed across various devices.
HTML template code validity
As HTML template code validity test cases are quite, to no surprise, HTML code focused, the QA team and I employed the help of a web developer to write and conduct them.
With the tests, our aim was to ensure the code used in emails was error-free and adhered to web standards.
These were the test cases we came up with:
HTML and CSS standards compliance:
- Checked if the HTML and CSS code adhered to specific standards.
Compatibility with email clients:
- Ensured that the HTML and CSS used were compatible with a wide range of email clients (like Gmail, Outlook, and Apple Mail) and web browsers.
Inline CSS:
- Tested whether CSS was correctly inlined and no external or internal stylesheets were used.
Use of tables for layout:
- Ensured that the layout used tables where necessary for better compatibility with email clients.
Fallbacks for unsupported features:
- Checked fallbacks for HTML or CSS features that were not supported in certain email clients.
Email sending test cases
Email contact form test cases? Check! Email body/content test cases? Check! So, what test case type was left for us to do? You guessed it, email sending!
With email sending test cases, your goal should be to ensure that an email delivery system is reliable and efficient by focusing on its functionality and performance. In other words, email sending test cases should verify that emails are sent correctly and suffer no delays or failures regardless of whether they’re bulk or single emails, plain text or HTML emails, emails with or without attachments, and so on.
If you go really “in-depth” with your email sending test cases, they can also help confirm if your email sending adheres to technical standards and protocols, as well as how your system handles errors and maintains speed and accuracy when it encounters high volumes of emails.
Here are the email test cases we conducted:
Email deliverability:
Checked if emails successfully reached recipients’ inboxes, not spam folders.
Verified email content, layout, and links for issues affecting deliverability.
Sender reputation:
Evaluated the trustworthiness of the email domain name and IP address.
Monitored for inclusion in blacklists.
Learn the ins and outs of email deliverability and sender reputation through dedicated Mailtrap tutorials:
Authentication:
Verified correct implementation of SPF, DKIM, and DMARC protocols.
Ensured emails are not flagged as spoofed or fraudulent by recipient servers.
Spam score:
Analyzed emails for factors triggering spam filters (keywords, formatting, links).
Utilized spam score testing tools to identify and rectify problematic elements.
Regulatory compliance:
Ensured compliance with legal standards like GDPR, CAN-SPAM Act, or CASL.
Reviewed email content, headers, and data handling practices for legal adherence.
Email list quality:
Evaluated the accuracy and relevance of email addresses in an email list.
Identified and removed invalid, inactive, or duplicate addresses.
How to write email test cases
Test case after test case, it seems that we’ve covered it all! And although it required time and effort, I’d say the team and I handled the test case writing and execution with ease thanks to having our own effective guide on the matter.
We’ll now take you through the steps included in our guide using our test case example!
1. Defining the objective
Every test case needs a clear purpose/objective. An objective that is well-defined, can set the stage for developing scenarios and criteria, guide the testing procedures, enable systematic and effective testing, as well as allow for precise measurements of performance.

2. Identifying test scenarios
For a single test case, there can be multiple potential scenarios requiring examination. Thus, as the second step, you need to identify all test scenarios, each of which represents a unique test condition.

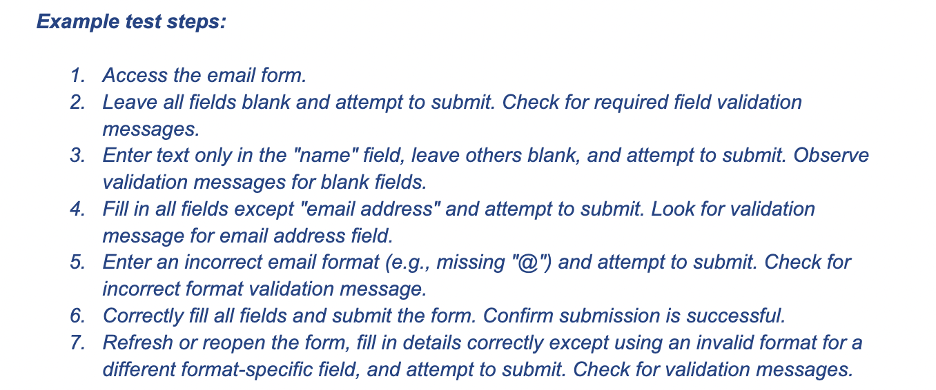
3. Specifying test steps
Once you have identified your test scenarios, it’s time to break them down into detailed, actionable steps to ensure the consistent and effective execution of each test. As a result, all aspects will be thoroughly tested, and if there is a step where an issue arises, identifying it will be simple.
4. Defining test data
Defining test data is pivotal in creating a realistic testing environment and entails specifying the exact data necessary for effectively conducting tests. By doing this and precisely specifying test data, each test scenario can be as close to real-world conditions as possible and thus provide reliable and applicable results.

5. Setting expected results
To establish benchmarks against which actual test results can be compared, it’s necessary to clearly define the anticipated outcomes/results for a test scenario by making them well-defined, measurable, and precise. This sets a clear standard for success and enables the objective assessment of a specific functionality or aspect. If any deviation is present in a test outcome, this approach allows it to be identified as an issue or bug.

6. Including validation points
Although it might sound like this next step is essentially the same as setting expected results, it serves a distinct purpose in the test case formulation process. You see, by including validation points, you are going a step further by identifying specific elements or conditions that need to be checked during test execution and help confirm whether a test case has passed or failed.

7. Considering negative test cases
An email system will encounter an eventual failure, and this step is where you focus on those scenarios and not just the positive test cases. During it, you are deliberately coming up with conditions that are expected to produce errors so you can challenge a system’s ability to handle them or invalid inputs as well as its response to the same.

8. Accounting for edge cases
Along with failures, unusual and extreme scenarios do happen in real-world situations. These scenarios are called edge cases, and accounting for them is important in order to ensure an email system can last through a wide range of scenarios without failing.

9. Documenting pre-conditions and post-conditions
Lastly, before executing any tests, you need to specify the conditions that should be in place. This way, you create a valid test with reliable results that can be repeated and also can easily understand the impact of the test on a system.


What software do you need to write and conduct email test cases?
While we are very proud of the effort we put into our email test cases, it’s important to note that there are software solutions we use that make writing and conducting them a streamlined and accurate process.
First, we have test case management tools that help organize, manage, and track various test cases and test case outcomes for manual tests and tests done with automation.
Some options worth considering include:
TestRail Quality OS – TestRail Quality OS is a centralized QA platform that allows you to build, connect, and optimize testing processes. Users of the platform can design test processes with reusable test cases, build and collaborate on agile or waterfall test cycles, record test results, generate defect reports, and do much more.
PractiTest – PractiTest is a centralized QA hub with AI-driven capabilities. With it, you can manage all kinds of tests in one shared platform, manage QA artifacts, integrate any tool or connect any automation solution, visualize data, and collaborate with different teams.
Xray – Xray, the native test management solution, gives full control of the entire testing process by indexing tests in real time. It also allows you to pinpoint what to fix with ease, thanks to its detailed traceability reports.
Second, come the tools for monitoring and logging system performance and security. This could be a network analyzer or a security testing tool that will essentially enable you to cover the performance and security email test case aspects.
Here are some popular options:
Nagios – Nagios comes in both an open-source version called Nagios Core equipped with complete infrastructure monitoring, free add-ons, an open-source monitoring engine, forum support, and a pre-configured VM, as well as four commercial versions. The commercial versions also focus on infrastructure monitoring along with log management, network analysis, and more.
Splunk – Splunk is a unified security and observability platform that helps find and fend off threat actors, fix issues faster, and diminish downtime. It also uses AI to identify key risks and threats in the early stages.
Datadog – Datadog serves as an observability and security platform for cloud applications and enables its users to see across systems, apps, and services. The platform not only integrates but also automates infrastructure monitoring, application performance monitoring, log management, real-user monitoring, and more.
The third and final necessary software type is email platforms or dedicated email testing environments where you can stimulate real-world email sending and receiving conditions.
At Mailtrap, we have our own email testing solution included in the Mailtrap Email Delivery platform.
With Mailtrap Email Testing, you can capture SMTP traffic from staging and dev environments. The solution then works as an email sandbox where you can inspect and debug emails before sending them to recipients.
And if you’re not looking to do manual testing, with Email Testing’s flexible API, you can automate test flows and scenarios with ease and skip using Selenium or similar test automation frameworks.
How exactly can Email Testing be used for email test cases, you may ask? Well, considering this solution comes with features such as HTML/CSS check, spam score check, email preview, email headers and BCC check, and multiple inboxes for different projects and stages, it can come in especially handy for email content/body test cases we covered earlier in the article.
So, simply select an Email Testing integration available in 20+ languages/frameworks (Java, .NET, PHP, and others) or copy the SMTP credentials and get to work!
Other solutions you can use to mimic real-world email sending and receiving include:
MailHog – MailHog was built with Go and works as an open-source email testing tool that can run without installation on multiple platforms. With it, you can configure an SMTP server that will capture outgoing email and then view the email in a web UI.
FakeSMTP – The open-source desktop application FakeSMTP provides a GUI for testing emails in applications. To enable email testing, it intercepts emails sent from an application and then displays them to the user.
Ready, set, go!
Even if you’re like me (a complete beginner in the email test case arena), after reading this article, you should hopefully have a good understanding of the different types of email test cases and how to create your own.
For your first try, I suggest firmly sticking to our short “How to write email test cases” guide, as well as seeking the guidance of QAs experienced in email and software testing. Then, as you gain more experience yourself, this should all become a straightforward, fast, and efficient process, with the help of the right tools, that is 😉
For more information on email testing, give some of our other blog posts a read:
Interested in learning all about emails through video tutorials? Then check out the Mailtrap YouTube channel and explore more useful content on the Mailtrap blog!


